Brief Overview
A Quick Consult allows you to add clinical information to a patient's record, without first needing an appointment booked for the day. This can be useful to record conversations with a patient such as in emergency situations, write notes about a result recently received, or to write a prescription or request for the patient.
Quick Consults can only be created by doctor users.
Short Version
- Click on the Quick Consult icon in the Scheduler or Patients List.
- Record any notes and take any required actions in the clinical file.
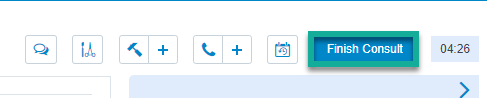
- Click End Consult.
- Select Quick Consult if there was no appointment related.
- Select Regular Appointment if there were an appointment related to these notes, and complete the appointment details.
Instructions
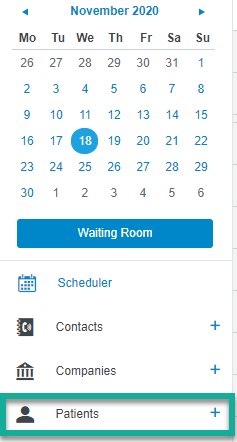
The Quick Consult can be started from the Scheduler or the Patients List windows.
Opening a Quick Consult from the Appointment Scheduler
1. From the Scheduler, click on the Quick Consult icon.
![]()
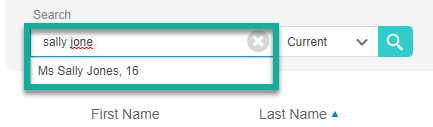
2. Search for and select the patient.

Opening a Quick Consult from the Patients List
1. Select the Patients menu on the left.
2. Search for and select the patient from the Search box.
3. Use the drop-down arrow icon beside the patient, and select Quick Consult.

Recording a Quick Consult
Once you have begun a Quick Consult using the instructions above, then there are several things that you may wish to do. Clicking each of the links below will take you to an article that describes how to perform each function:
- Recording Consult Notes
- Writing a Prescription
- Creating a Pathology Request
- Creating an Imaging Request
- Adding Checklists
- Create an Operation Report
- Record Vitals
- Add a Document
Finishing a Quick Consult
1. When you have finished adding any required information for the consult, you must then click on Finish Consult.
2. You will then be asked whether the notes you have recorded are for a regular scheduled appointment, or whether it was a Quick Consult (not linked to an appointment). Make the relevant selection.
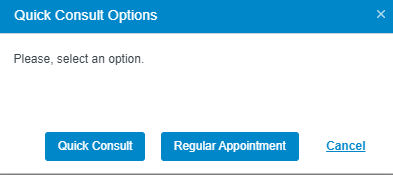
A) If you select Quick Consult the information entered will be saved, and you will be returned to the Scheduler.
B) If you select Regular Appointment, the information will be saved, and you will be asked for the time and date of the appointment to finalise the process.