Brief Overview
Recalls are used as reminders to organise an appointment for a patient after a certain length of time (ie 4 weeks or 12 months). Recalls are normally used for things such as post-operative follow-ups, the ongoing monitoring health conditions, annual checkups, or to discuss recent test or scan results.
Short Version
- Click the Add Recall icon in the Scheduler.
- Search for and select the patient.
- Complete the recall information using the fields provided.
- Record any relevant notes.
- Click Create.
Instructions
Recalls can be added from two areas within Clinic to Cloud: the Scheduler and from within a Current Consultation.
Adding a Recall from the Scheduler
Highlight a patient and click the Add Recall button, or click the Add Recall button and search for and select the patient.

Adding a Recall during a Consultation
Click the Add Recall button.

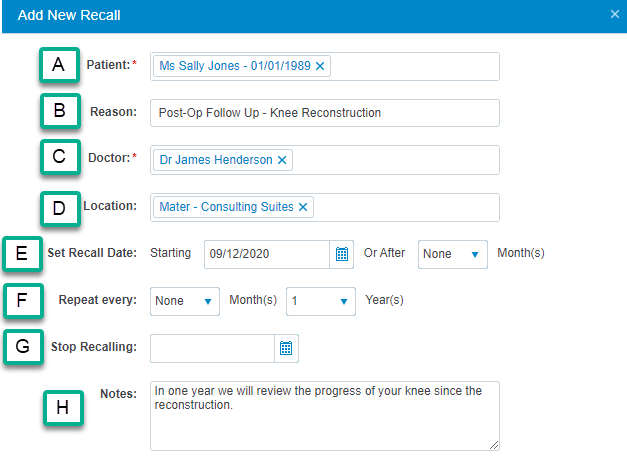
1. Complete the Recall information.
| A | Patient | Search for and select the patient. This is unnecessary in a consultation. |
| B | Reason | The name of the recall, and why the patient must return. |
| C | Doctor | The doctor who needs to see the patient. |
| D | Location | Where the patient's appointment should be held. |
| E | Set Recall Date | The due date for the recall - when you'd like the patient to return. |
| F | Repeat Every | Allows the patient to be recalled at a certain interval (ie monthly). |
| G | Stop Recalling | The last date a patient should be recalled to the practice. |
| H | Notes | Further information about the recall, patient, or appointment if needed. Please note, this information is shared with the patient in the Patient Portal (if enabled). |
2. If you would like an SMS to be sent to the patient when their recall is due, tick the Send SMS field.
A) Recall SMS are sent at 9:00AM on the Recall Due Date.
B) This will incur normal SMS fees.

3. Click Create.
4. The Recall will then be added to the patient's permanent clinical record, and can be found in the Recalls window.

For information on managing your recalls, please see this article.